Getting Started
Ameba MicroPython: Getting Started with AMB21/AMB22
Required Environment
AMB21/22 MicroPython SDK currently supports Windows 10 and Linux operating systems.
Introduction to AmebaD[AMB21/AMB22]
Ameba is an easy-to-program platform for developing all kind of IoT applications. AmebaD is equipped with various peripheral interfaces, including WiFi, BLE, GPIO, I2C, UART, SPI, PWM, ADC and so on. Through these interfaces, AmebaD can connect with electronic components such as LED, switches, manometer, hygrometer, PM2.5 dust sensors, …etc.
The collected data can be uploaded via WiFi and be utilized by applications on smart devices to realize IoT implementation.
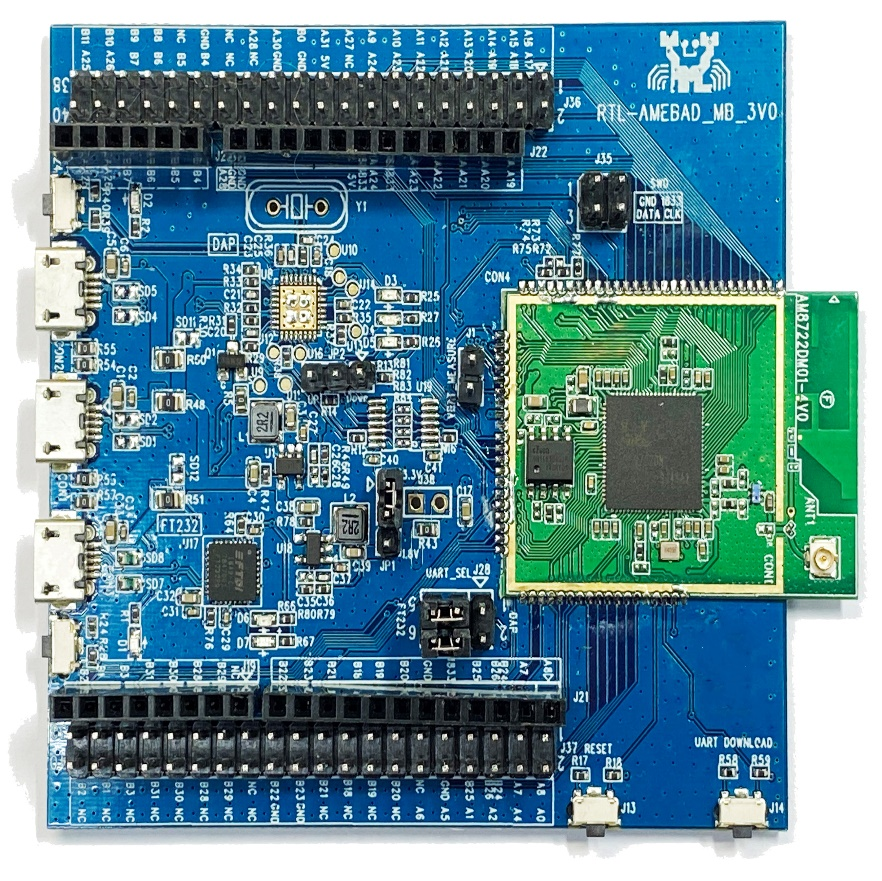
AMB21/AMB22 and Arduino Uno have similar size, as shown in the above figure, and the pins on AMB21/AMB22 are compatible with Arduino Uno.
AmebaD uses Micro USB to supply power, which is common in many smart devices.
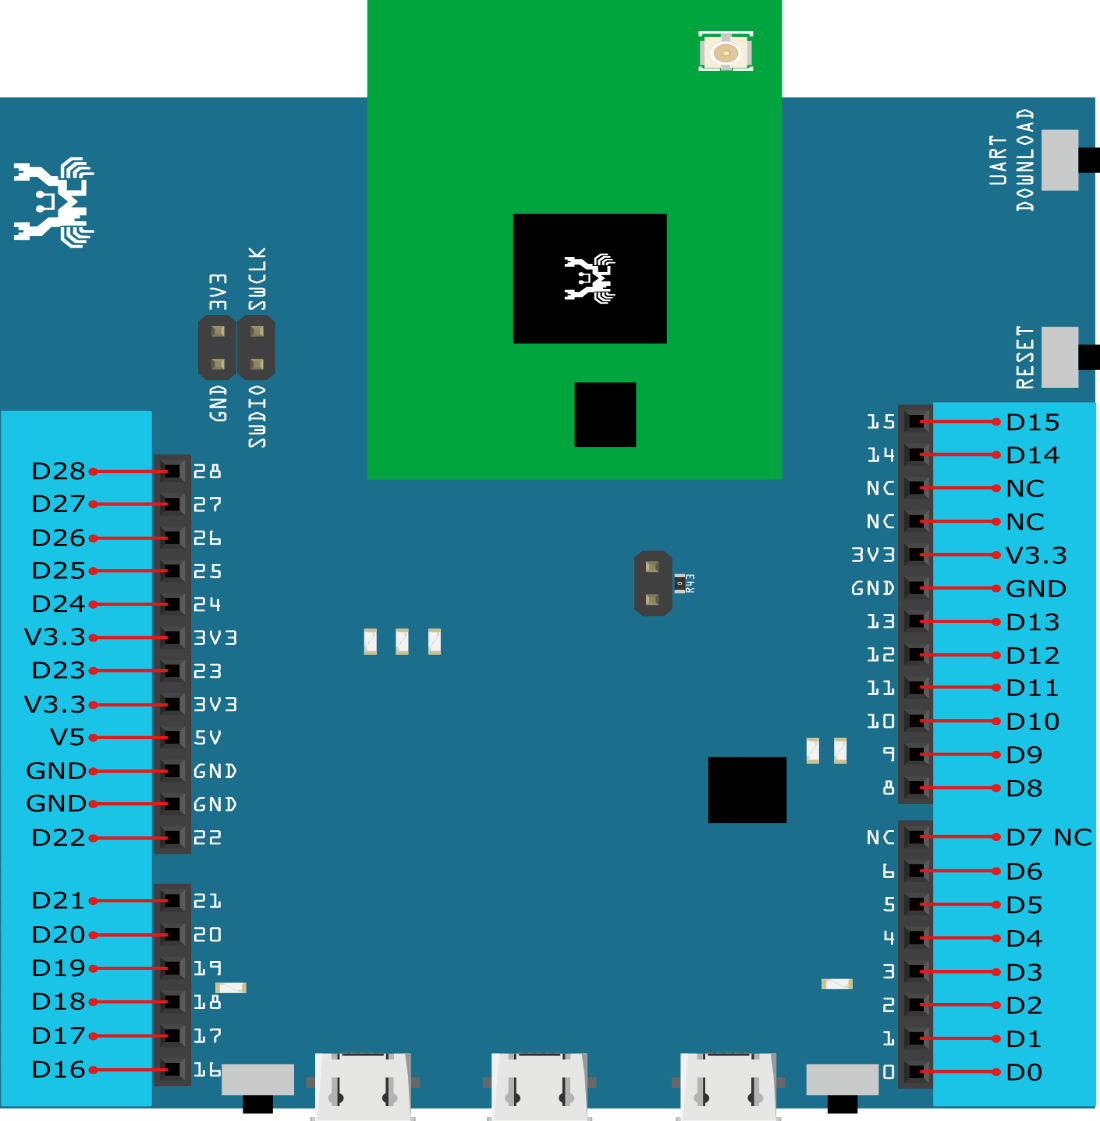
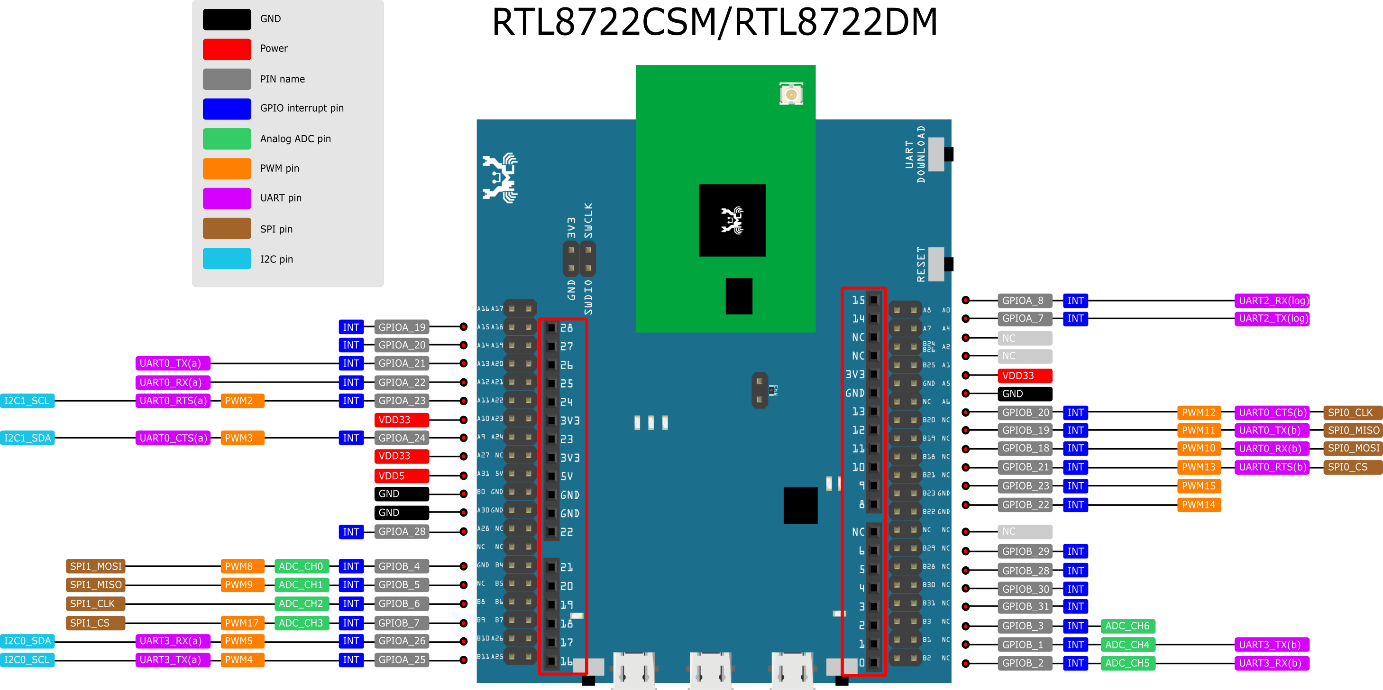
Please refer to the following figure and table for the pin diagram and function of AmebaD.
PIN name |
GPIO |
ADC |
PWM |
UART |
SPI |
I2C |
|
|---|---|---|---|---|---|---|---|
D00 |
GPIOB_2 |
✓ |
ADC5 |
UART3_RX(b) |
|||
D01 |
GPIOB_1 |
✓ |
ADC4 |
UART3_TX(b) |
|||
D02 |
GPIOB_3 |
✓ |
ADC6 |
||||
D03 |
GPIOB_31 |
✓ |
|||||
D04 |
GPIOB_30 |
✓ |
|||||
D05 |
GPIOB_28 |
✓ |
|||||
D06 |
GPIOB_29 |
✓ |
|||||
D07 |
NC |
||||||
D08 |
GPIOB_22 |
✓ |
PWM14 |
||||
D09 |
GPIOB_23 |
✓ |
PWM15 |
||||
D10 |
GPIOB_21 |
✓ |
PWM13 |
UART0_RTS(b) |
SPI0_CS |
||
D11 |
GPIOB_18 |
✓ |
PWM10 |
UART0_RX(b) |
SPI0_MOSI |
||
D12 |
GPIOB_19 |
✓ |
PWM11 |
UART0_TX(b) |
SPI0_MISO |
||
D13 |
GPIOB_20 |
✓ |
PWM12 |
UART0_CTS(b) |
SPI0_CLK |
||
D14 |
GPIOA_7 |
✓ |
UART2_TX(log) |
||||
D15 |
GPIOA_8 |
✓ |
UART2_RX(log) |
||||
D16 |
GPIOA_25 |
✓ |
PWM4 |
UART3_RX(a) |
I2C0_SCL |
||
D17 |
GPIOA_26 |
✓ |
PWM5 |
UART3_TX(a) |
I2C0_SDA |
||
D18 |
GPIOB_7 |
✓ |
ADC3 |
PWM17 |
SPI1_CS |
||
D19 |
GPIOB_6 |
✓ |
ADC2 |
SPI1_CLK |
|||
D20 |
GPIOB_5 |
✓ |
ADC1 |
PWM9 |
SPI1_MISO |
||
D21 |
GPIOB_4 |
✓ |
ADC0 |
PWM8 |
SPI1_MOSI |
||
D22 |
GPIOA_28 |
✓ |
|||||
D23 |
GPIOA_24 |
✓ |
PWM3 |
UART0_CTS(a) |
I2C1_SDA |
||
D24 |
GPIOA_23 |
✓ |
PWM2 |
UART0_RTS(a) |
I2C1_SCL |
||
D25 |
GPIOA_22 |
✓ |
UART0_RX(a) |
||||
D26 |
GPIOA_21 |
✓ |
UART0_TX(a) |
||||
D27 |
GPIOA_20 |
✓ |
|||||
D28 |
GPIOA_19 |
✓ |
Note
Not all sets of peripherals shown on the picture/table above are available on MicroPython, please refer to API Documents for more information.
Introduction to AMB21/AMB22 MicroPython port
Background Information
REPL stands for Read-Evaluation-Print-Loop, it is an interactive prompt that you can use to access and control your microcontroller.
REPL has been equipped with other powerful features such as tab completion, line editing, auto-indentation, input history and more. It basically functions like the classic Python IDLE but running on microcontroller.
To use REPL, simply open any serial terminal software (most common ones
are teraterm, putty etc.) on your PC and connect to your
microcontroller’s serial port, then set baudrate to 115200 before
manually reset the board, then you will see >>> MicroPython prompt
appear on the terminal. Now you may type in any Python script on REPL as
long as it’s support by MicroPython and your microcontroller’s
MicroPython port.
Most importantly, try to abuse “help()” function as much as possible to
gain more information. For example, upon microcontroller power up and
REPL shown, just type
>>> help()
You will see a help page giving you more details about this port; also if you type
>>> help(modules)
it will list out all available builtin modules that are at your disposal
Furthermore, if you want to learn more about a module, such as its API and CONSTANT available, simply type the following code and details of that module will be returned to you,
>>> help(the module of your interest)
Let’s take Pin module (GPIO) as an example:
>>> help(Pin)
object <class 'Pin'> is of type type
   id -- <function>
   init -- <function>
   value -- <function>
   off -- <function>
   on -- <function>
   toggle -- <function>
   board -- <class 'board'>
   IN -- 0
   OUT -- 1
   PULL_NONE --0
   PULL_UP --1
   PULL_DOWN --2
REPL Hotkeys
Ctrl + dSoft reboot MicroPython will perform software reboot, this is useful when your microcontroller is behaving abnormally. This will also run scripts in ‘boot.py’ once again. Note that this will only reset the MicroPython interpreter not the hardware, all your previously configured hardware will stay the way it is until you manually hard-reset the board.
Ctrl + ePaste mode Paste mode allow you to perform pasting a large trunk of code into REPL at once without executing code line by line. This is useful when you have found a MicroPython library and wish to test it out immediately by copy and paste
Ctrl + bNormal mode This hotkey will set REPL back to normal mode. This is useful if you are stuck in certain mode and can not get out.
Ctrl + cQuick cancel This hotkey help you to cancel any input and return a new line
Setting up Development Environment
Step 1. Installing the Driver
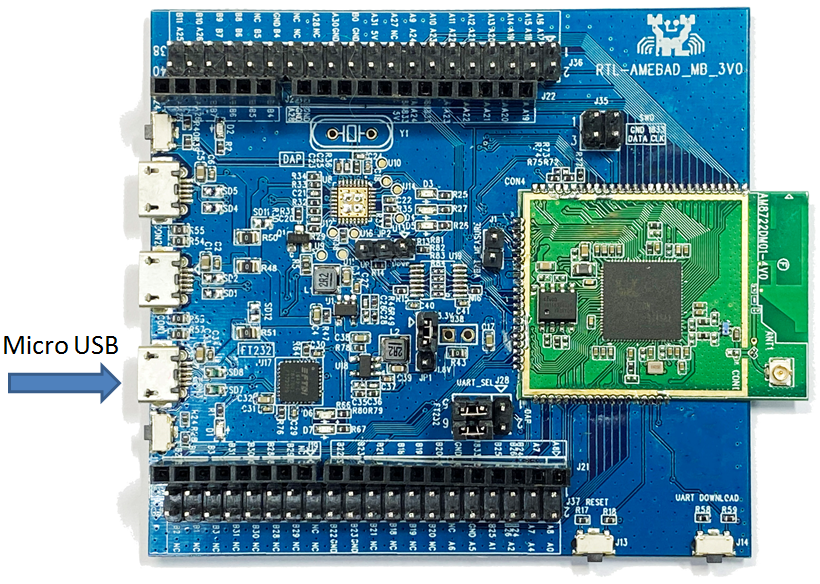
First, connect AMB21/AMB22 to the computer via Micro USB:
If this is the first time you connect AmebaD to your computer, the USB driver for AMB21/AMB22 will be automatic installed.
If you have driver issue of connect board to your computer please go to https://ftdichip.com/drivers/ for USB driver.
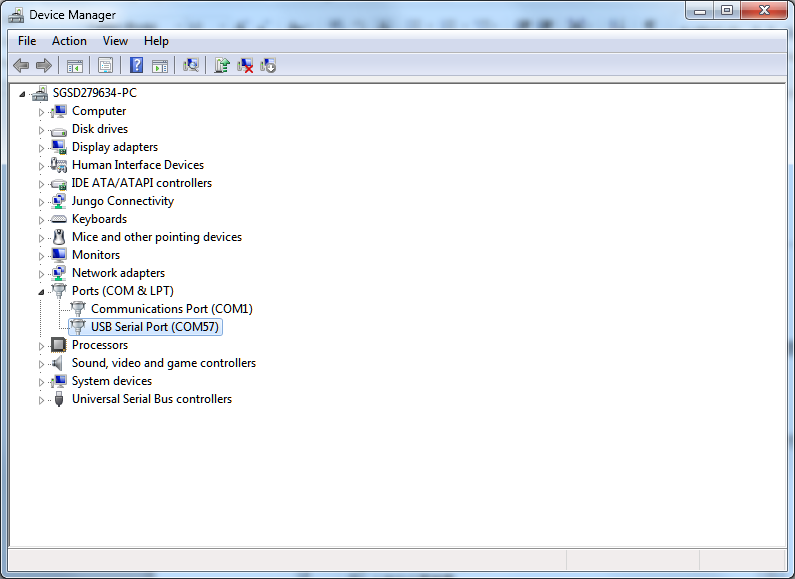
You can check the COM port number in Device Manager of your computer:
Step 2. Installing the necessary tools
On Windows
For Windows users, please install a serial terminal software to interact
with MicroPython. The most common serial terminals are Tera Term and
Putty, here we recommend using Tera Term, which can be downloaded
from internet.
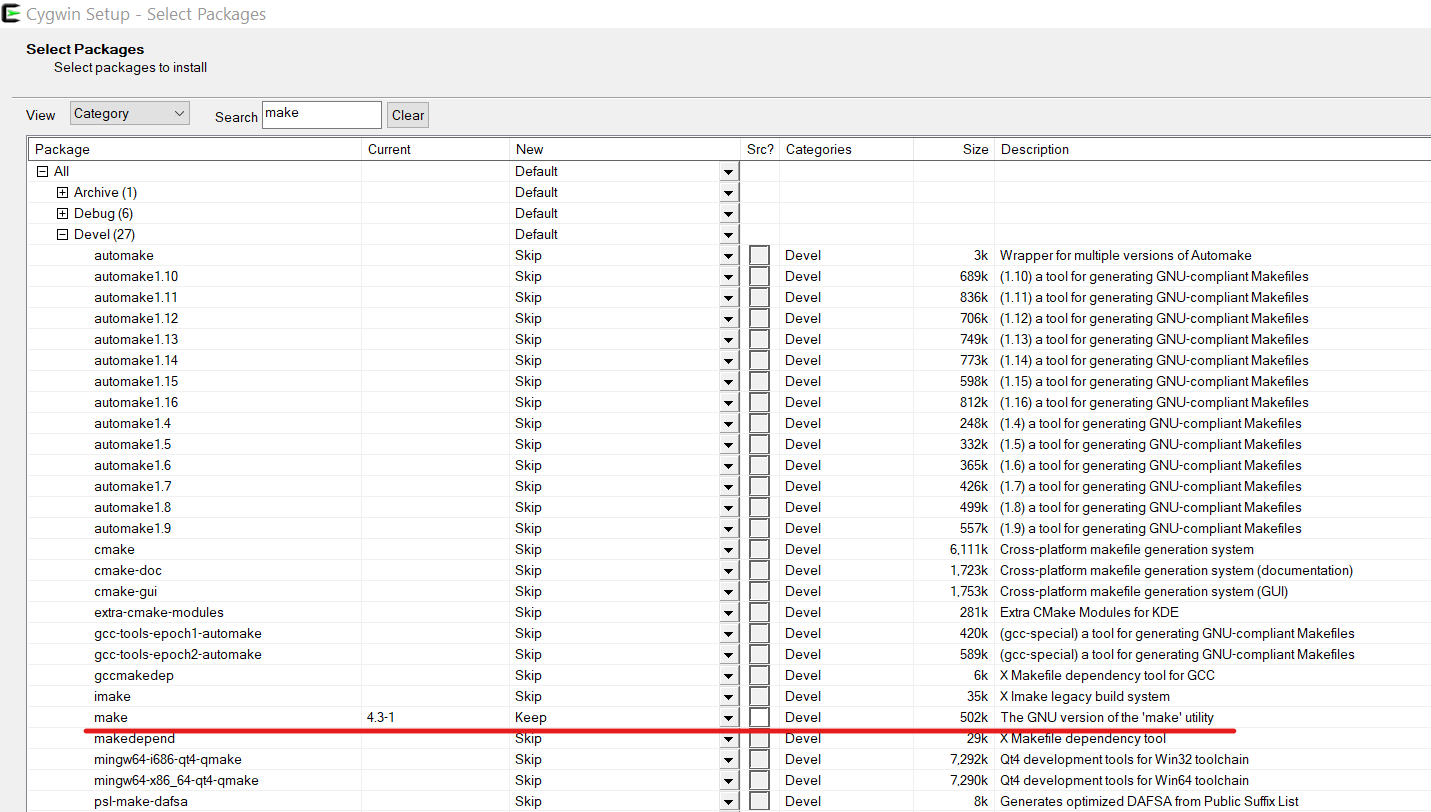
For advanced developer who wish to compile MicroPython firmware from
scratch, then please be sure to install Cygwin, which is a
Linux-like environment running on Windows system. When selecting the
Cygwin installer, we recommend using the Cygwin 32-bit version. During
Cygwin installation, installer will prompt user if wish to install other
software, please make sure to select the GNU version of make from
the Devel category (see picture below) and pick the latest edition.
Also, Python3 is required during firmware compilation, so be sure to download the latest Python3 from its official website and have it added as environment variable when asked during installation.
On Linux
For Linux user, please install a serial terminal software of your choice
using apt-get install command. Here we recommend using picocom for
its lightweight.
For advanced developer interested in developing MicroPython module in C, please make sure the GNU make of at least version 3.82 or newer and Python3 are installed and can be found using terminal.
Upload Firmware into Ameba
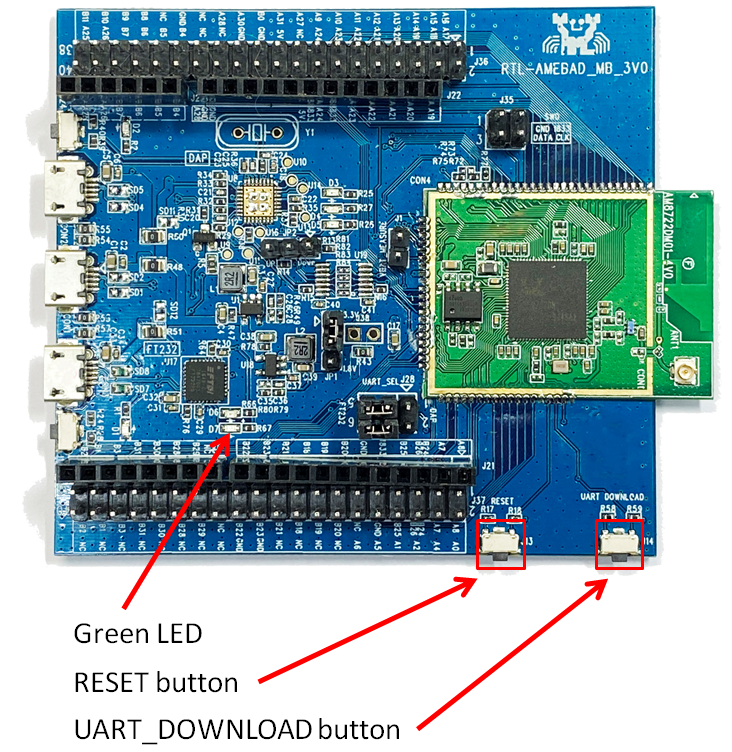
Step 2. Enter UART Download mode
To do this, first press and hold the UART_DOWNLOAD button, then press
the RESET button. If success, you should see a green LED flashing on
your ameba.
Step 3. Run “Double-Click-Me-to-Upload”
As the name suggested, double click on the file to run it, follow instructions printed on the screen to update the ameba’s serial COM port (this is known to us during the driver installation step mentioned above) so the uploading can be carried out successfully. Once the uploading is successful, you will see a line of log printed on the screen – “All images are sent successfully”
Try the First Example
Step 1. Open REPL
REPL stands for Read, Evaluate, Print and Loop, it is the
MicroPython’s terminal for user to control the microcontroller. REPL is
running on LOG UART, thus we need to open our serial terminal software,
in this case, Tera Term to see REPL.
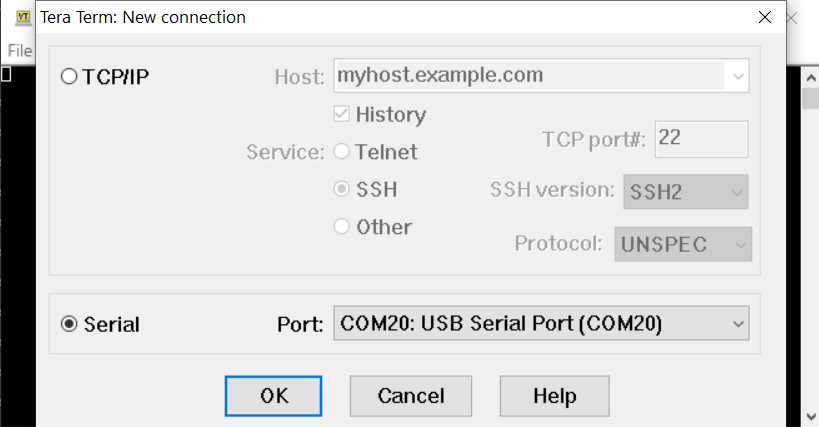
Once Tera Term is opened, select “Serial” like in the picture above and
choose your Ameba’s serial port using the dropdown list, after that, hit
“OK”. If your serial terminal is not configured to 115200 baud rate, now
is the time to change it to 115200 and leave the rest of settings as
default.
Now that the serial port is connected, press the RESET button once on your ameba and you should see the MicroPython’s welcome page as shown below.
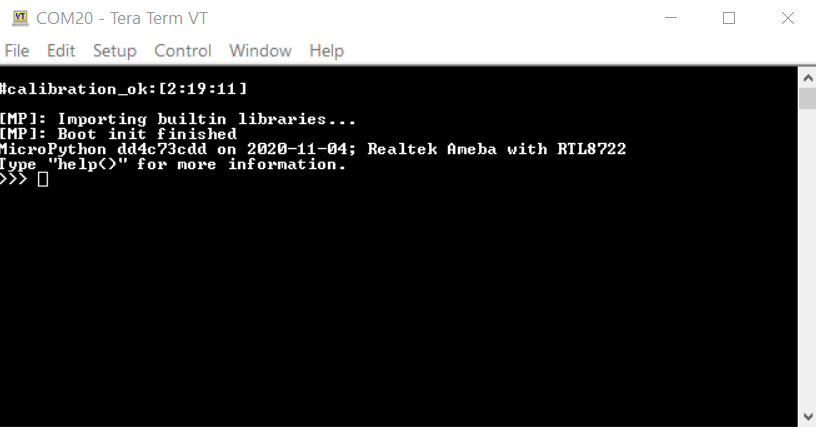
What happened here was that your Ameba first check its calibration data
and then boot into MicroPython’s firmware, MicroPython then run the
“boot.py” python script and imported builtin libraries.
Now, you can simply type
>>> help()
to see more information, and type
>>> help(modules)
to check all readily available libraries.
Step 2. Run WiFi Scan example
As most of peripherals’ examples requires additional hardware to show the example is working, we will just use WiFi Scan example as our first example and to see how easy it is to control WiFi using MicroPython.
Now, please follow along by copy+paste the following code or manually
typing them out into Tera Term and hit “Enter”
from wireless import WLAN
wifi = WLAN(mode = WLAN.STA)
wifi.scan()
You should be able to see the returned result with all discovered wireless network in your surrounding

(End)
Note
If you face any issue, please refer to the FAQ and Trouble-shooting page.